For
BizTalk Server to play a full role within the service bus, it must be
able to not only expose service endpoints, but also easily consume
them. Let's take a look at how to create an orchestration, which
accepts messages through the WCF-NetTcp receive location created earlier and also calls a WCF service that reveals a single endpoint based on Named Pipes.
We start by adding a new orchestration file named LookupOrderContact.odx
to our existing BizTalk project in Visual Studio.NET. The orchestration
starts up when a new order arrives. Therefore we should create a new
orchestration message of type Seroter.BizTalkSOA.Chapter3.OrderManagement.BizTalk.NewOrder_XML NewOrder_Input.
After the order is received, we then call an existing WCF service,
which provides us with more details about the customer placing the
order. What do we need to know to call the WCF service from our
orchestration? If you guessed the following, you'd be right: named
Instead
of having to manually produce these artifacts and configurations, we
should use BizTalk-provided tools to do the work for us. If you wanted
to reference a WCF service from a standard Visual Studio.NET project
(for example class library, ASP.NET application), you could use the Add Service Reference option available by right-clicking the project. However, adding WCF references to BizTalk projects works a bit differently.
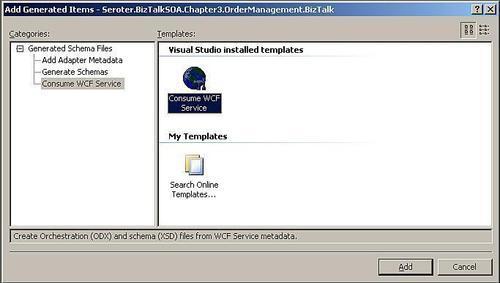
To add a WCF service reference, first right-click the BizTalk project and choose Add and then Add Generated Items.
We are presented with a window that Visual Studio.NET uses to
auto-construct BizTalk artifacts such as schemas based on adapter
endpoints. We want to choose the Consume WCF Service option and click Add.
Now we get the pleasure of working with the BizTalk WCF Service Consuming Wizard. This is the twin brother of the BizTalk WCF Service Publishing Wizard, except that instead of generating new services, it produces the artifacts necessary to consume existing ones.
The
first thing the wizard has to find out is where to get the metadata
needed to craft the artifacts for BizTalk. If you only have a physical
XSD and WSDL file (assuming someone went the true contract-first design
route), then the second option in the wizard, Metadata Files,
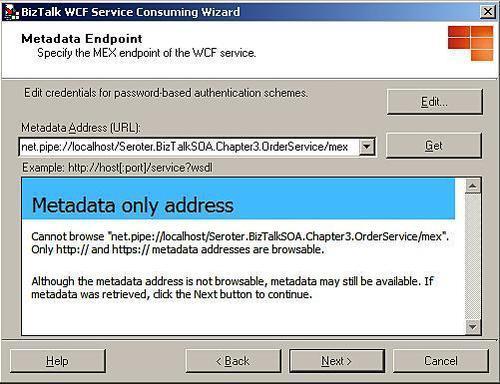
is best. However, if the target service is live and allows metadata
queries, we can choose the first option. In our case, I have a running
service with a WCF-NetNamedPipe endpoint and an explicit MEX endpoint. After choosing the metadata source as Metadata Exchange Endpoint, we then plug in the address of the metadata URL. In my case, this value is net.pipe://localhost/Seroter.BizTalkSOA.Chapter3.OrderService/mex.
Notice that while only http(s) endpoints actually produce browsable
metadata, any WCF endpoint can still expose metadata to query.
On the next wizard page (assuming that our service was accessible), we see a summary of what the wizard is about to import.
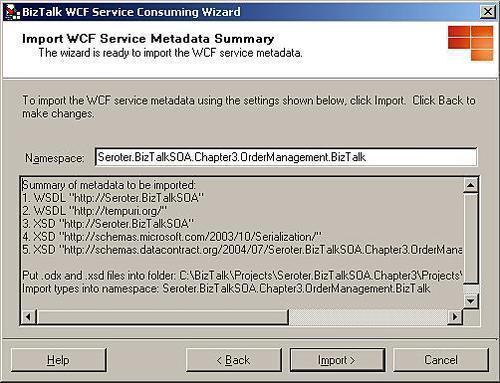
A
number of files are generated including three different XSD schemas.
These schemas describe the data types contained in the service
contract. We also get two BizTalk binding files: one for the adapter
type used in the metadata request (in our case, WCF-NetNamedPipe) and another we can optionally use to configure a WCF-Custom
send port. In addition, the wizard emitted a new orchestration, which
contains type definitions for multi-part messages representing the
contract schemas, and, a port type that reflects the message exchange
pattern of the target service.
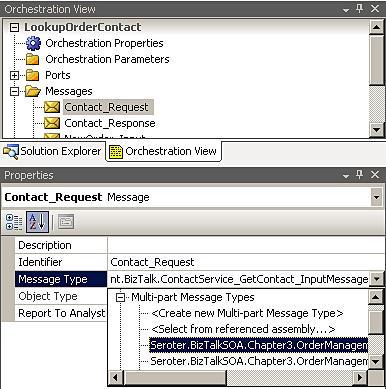
Back
in our primary orchestration, we now add the messages used for calling
the service and handling the response. These messages (Contact_Request,Contact_Response) are created by using the multi-part message types defined in the wizard-generated orchestration.
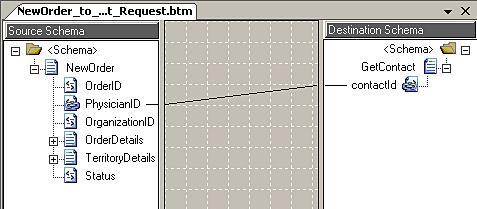
The
service input message is represented as a complex (schema) type, so a
BizTalk map is necessary to instantiate the new orchestration message.
This means our orchestration requires a Construct shape in concert with a Transform shape that points to a new map. The map is quite simple as all we need to do is transfer the data in the target schema's PhysicianID XML node to the destination schema's contactId node.
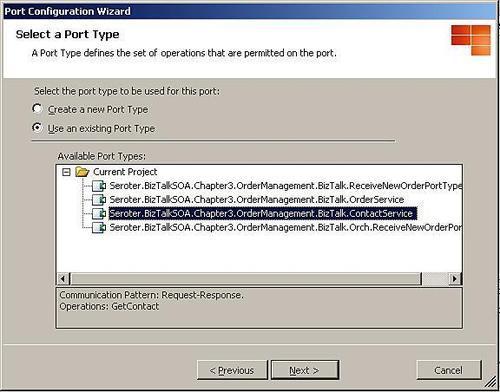
Once the map is finished, we add the Send and Receive shapes to the orchestration. The orchestration will send the request message and receive the response Message
properties are set on them, we create the logical port used by the
orchestration to communicate with the service. After choosing to create
and name a New Configured Port, we want to choose an existing port type for this port. message. Once the shapes are dropped on the orchestration, and the corresponding
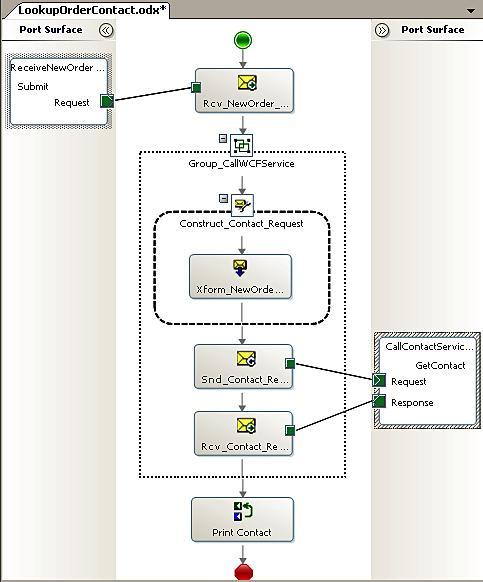
On
the next wizard page, we confirm that the direction of the port is set
to send a message and receive a response. We should now connect the
service's send and receive shapes with the connectors on the logical
port operation. Our final shape in the orchestration should be an Expression
shape where a success confirmation is printed. If we want to extract
data from the response message as proof that the response was
successfully received, then we need to distinguish a field within the
service response schema. In my case, I distinguished the Name
element and printed that value out. To complete the orchestration, I
added a new logical receive port for accepting the inbound order. The
finished orchestration looks like this:
After deploying the orchestration, we have a few remaining tasks to perform from inside the BizTalk Administration Console.
First, the generated BizTalk binding file should be imported so that
our WCF send port is created automatically for us. Importing a binding
is done by right-clicking the BizTalk application (in our case, named BizTalkSOA), choosing Import and then Bindings. Point this dialog box to the adapter-based binding (in our case, named ContactService.BindingInfo.xml) WCF-NetNamedPipes adapter. That port should be turned on by right-clicking it and choosing Start. instead of the custom binding. After the import succeeds, we see a new (un-enlisted) send port that utilizes the

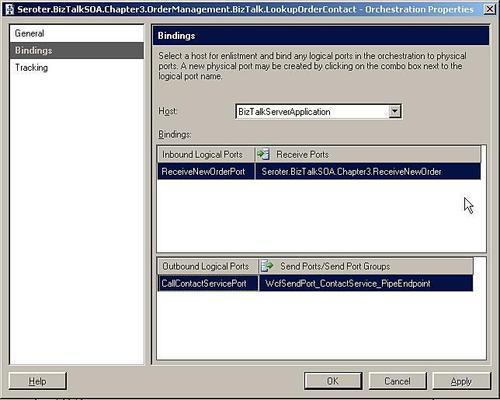
Our final step is to bind and enlist the orchestration. We created a one-way WCF-NetTcp
receive channel in the previous exercise and can reuse that receive
port as our input to the orchestration. The orchestration binding is
represented as follows:
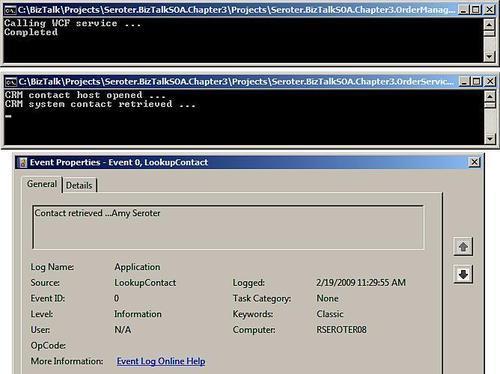
Once we start the orchestration, and ensure that the downstream service
is up and running, we should trigger our client service. From the
following screenshot, you can see that the client succeeded, the
downstream service registered an invocation, and the orchestration
successfully sent a trace message to the application Event Log.